

Ice Fishing in Illinois
Where to Ice Fish
Before heading out for a day of ice fishing, it's wise to check with local bait shops to make certain the spot you've chosen is adequately ice covered and at the thickness needed.
Once you have bundled up and made it to your lake or river of choice, make sure to thoroughly check the ice thickness for yourself before you drop your lines. Ice should be at least 4" thick to support your weight. Clear-blue, lake ice is the strongest, while river ice and cloudy ice support less weight. Once the ice turns slushy, it supports half the weight of clear-blue ice. Click on the Ice Fishing Safety tab above for more information.
Again, check with local bait shops to see if the lake you're interested in fishing has adequate ice cover. Below are a few spots in Illinois for ice fishing:
Lake County:
Here are the locations in the Lake County Forest Preserves that are open for ice fishing:
- Banana Lake in Wauconda;
- Independence Grove, in the South Bay only, off Buckley Road in Libertyville;
- Sterling Lake at Van Patten Woods.
Ice Fishing Clothing
There is nothing that will ruin an ice fishing trip than not being adequately covered. If you're cold, the pleasure of the ice fishing experience will quickly turn to unpleasant. Here are some tips for keeping yourself toasty while out on the ice:
Photo credit: http://illinoiswisconsinfishing.blogspot.com
- Layered clothing – Staying warm and dry is important. A moisture-wicking base layer, an insulated middle layer, and a breathable outer shell are recommended.
- Insulated boots – Wearing moisture-wicking liner socks under warm socks and insulate boots are recommended.
- Scarf, hat and gloves – Bring an extra pair of gloves in case you get the other pair wet.
- Ice cleats
- Ice safety picks – Wear safety picks (short plastic rods with metal picks) around your neck in case of an emergency.
- Personal Floatation Device
Ice Fishing Tools
Because you are fishing on ice and not open water, you will obviously need some different tools for a successful day of fishing. Much like open water fishing, the amount of money you spend on your set up can range from reasonable to extravagant depending on your tastes. Luckily, to get started all you need is:
- Ice auger (diameter no larger than 12")
- Slotted scoop – to clear the ice/slush from your hole
- Bucket – used to transport your gear and your fish. Also can be used as a seat
- Pic/chisel – This is optional, but it is ideal for widening your hole or breaking through the ice on previously drilled holes.
- Tip-up – This is an optional tool, though one many ice anglers use. Most tip ups are made of wood, but some newer versions are circular in shape to help keep your hole from freezing up.
Ice Fishing Rods and Tackle
A smaller rod is often used for jigging when ice fishing. Aim for a rod between 16 and 32", with light, medium, or heavy power, depending on what you're targeting:
- For panfish, a light or ultralight rod may be best.
- For walleye or northern pike, a 24-28" medium or medium heavy rod would be best if you want to jig.
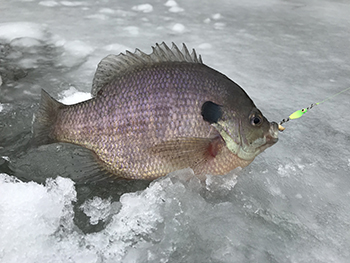
For panfish tackle, small is basically the rule. The ice jigs for panfish are usually a weighted size 8 to size 14 hook in varying shapes. A trip to a local bait store should set folks up with the "hot" sizes and colors.
Light line (1 to 2 lb) is the usually used, either monofilament or fluorocarbon depending on anger preference.
Ice Fishing Techniques
Drilling Holes
A common and successful ice fishing technique is to drill many holes. In general, the fish aren't leaving their area to find your bait, so you need to find the fish. You can use underwater cameras or flashers that you can drop down the hole to immediately see if fish are there to target, but you don't need fancy equipment to find fish. Scouting by trial-and-error is effective and often more rewarding. See our Ice Fishing Tips section for tips on finding fish.
Jigging
If you are using an ice fishing rod and hook-and-line while ice fishing, then a good technique to try is jigging. You can use lures or live bait while jigging. In general, live bait works best for ice fishing. Drop your line and let your jig hook sink to the bottom. Then slowly (very slowly) raise your bait up about a foot off the bottom. You can jig up and down, side to side or up and down and sideways. If you are moving your bait too much or too fast, the fish may think it is not worth the effort to go after it. Jigging works best for smaller fish like panfish.
Tightlining
Another technique to try is called tightlining. Tightlining is a technique where you do not move the line and lure once you drop it in the water rather you watch the line for movement. You know you have something on the line when it becomes "tight."
When tightlining, remember to use a lure heavy enough to allow your line to drop straight down to your desired depth, but not heavy enough that the line will not move when a strike occurs. Many anglers use trial and error to find the correct lure. Some anglers add a spring bobber to their line to help with strike indication. A spring bobber is a piece of metal or wire that extends off the rod tip. Any movement in the line will cause the spring bobber to move alerting the angler of a bite.
Tip Up
You can also use a tip up for ice fishing. This is technically a piece of equipment, but it is also a technique that is often used at the same time as you are jigging in a different hole. Alternatively, you can set up multiple tip ups and run between them as they go off.
You set the tip up above your ice fishing hole, drop your line, set the flag, and wait for the fish to take the bait. A heavier duty line (23-50 lb) is used with a swivel to keep your line from twisting with a swimming bait, and a 12-36" leader, depending on your situation.
For targeting larger fish, such as walleye, use a heavy, braided line.
Catch-and-Release Tips:
- Land a fish as soon as possible. Exhausting a fish lowers its chance of survival.
- When possible, do not use a net. Nets remove a fish's protective slime.
- Always wet hands before handling fish. This protects the protective slime.
- Use barbless hooks for easier hook removal.
- Keep fish in the water while removing the hook.
- Handle toothless fish by gripping the lower jaw.
- Handle fish with teeth behind the gill covers.
- Never grab a fish directly on the gill covers.
- Never grip a fish around the abdomen.
- If a fish swallows the hook do not attempt to remove it. Cut the line as close to the hook as possible and return the fish to the water.
- Gently place the fish in the water upon release; never throw a fish back.
See here for more catch-and-release guidelines.
Ice Fishing Tips
Local bait shops are excellent source of information regarding where fish are biting and what baits are working best. In addition, here are some ice fishing tips for a successful day of angling:
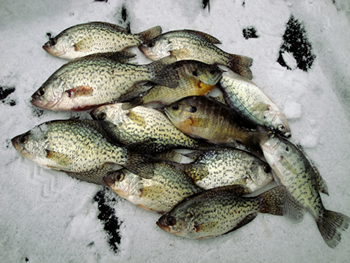
Photo credit: http://illinoiswisconsinfishing.blogspot.com
- Many fish will stick close to the same places in the winter as they do in the other seasons. Weed lines, structures, or coastline breaks are good places to look.
- Fish like areas where the mouth of a small bay or stream joins a larger lake, especially if the depth changes drastically. Look to these areas for concentrations of fish.
- In the winter, fish tend to swim horizontally at one depth. If you think you are in a good area, but are not getting a bite, change the depth at which you are presenting your bait, the fish may be resting higher or lower and not see the bait.
- In the winter, some fish species will cluster together. Since fish do not move as fast in the winter months, they are more vulnerable to predators. They tend to group together for protection. Where you find one, you will most likely find more. Because they do school, if you haven't had a bite in 20 minutes, move to a new location.
Ice Fishing Safety
We cannot stress enough the importance of safety when ice fishing. To borrow the "be prepared" motto, when you're properly prepared for the experience, ice fishing is a fun outdoor activity. Below are some guidelines to help you "be prepared."
Ice Facts
- New ice is usually stronger than old ice. Four inches of clear, newly formed ice may support one person on foot, while a foot or more of old, partially thawed ice may not.
- Ice seldom freezes uniformly. It may be a foot thick in one location and only an inch or two just a few feet away.
- Ice formed over flowing water and currents is often dangerous. This is especially true near streams, bridges and culverts. Also, the ice outside river bends is usually weaker due to the undermining effects of the faster current.
- The insulating effect of snow slows down the freezing process. The extra weight also reduces how much weight the ice sheet can support. Also, ice near shore can be weaker than ice that is farther out.
- Booming and cracking ice isn't necessarily dangerous. It only means that the ice is expanding and contracting as the temperature changes.
- Schools of fish or flocks of waterfowl can also adversely affect the relative safety of ice. The movement of fish can bring warm water up from the bottom of the lake. In the past, this has opened holes in the ice causing snowmobiles and cars to break through.
Ice Thickness
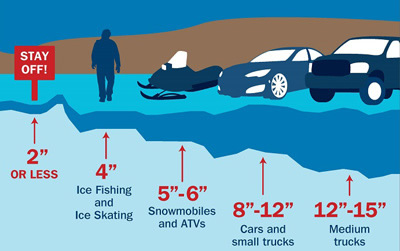
Used with permission of The Old Farmer's Almanac/Almanac.com
Here are the ice thickness safety guidelines:
- 2" or less - STAY OFF
- 4" - Ice fishing or other activities on foot
- 5" - Snowmobile or ATV
- 8" - 12" - Car or small pickup
- 12" - 15" - Medium truck
Note: These guidelines are for new, clear solid ice and many factors other than thickness can cause ice to be unsafe.
Note: White ice or "snow ice" is only about half as strong as new clear ice. Double the above thickness guidelines when traveling on white ice.
Additional Safety Tips:
- It's a good idea to always carry with you a rope or floatation device to help someone who may have fallen through the ice. Remember NOT to approach the area where someone has fallen through, as this ice will be quite vulnerable to weight.
- Wear a personal floatation device (life vest) under your winter gear.
- Carry a pair of ice picks. It's very difficult to pull yourself back onto the surface of slippery ice while weighted down with heavy clothing. The ice picks really help pulling yourself back onto solid ice.
Please view this excellent video, by Pike Pole Fishing, about self rescue on ice. Always be prepared.